Kobold Dungeon -200: Difference between revisions
From Stormhalter
No edit summary |
No edit summary |
||
| (18 intermediate revisions by the same user not shown) | |||
| Line 1: | Line 1: | ||
[[File:-200bloods.png|thumb|Kobold Dungeon - | [[File:-200bloods.png|thumb|Kobold Dungeon -200]]<div>The second floor of the Kobold Dungeon has similar monsters to the first, but contains a boss at the very end of the tunnel named Urgnah. | ||
Adventures hoping to find refuge in the pools of blood inside of Urgnah's room will quickly find themselves being chomped on by vicious piranhas!</div> | Urgnah room contains multiple enemy packs. Adventures hoping to find refuge in the pools of blood inside of Urgnah's room will quickly find themselves being chomped on by vicious piranhas!</div> | ||
'''Connected Areas''' | <big>'''Connected Areas'''</big> | ||
* [[Kobold Dungeon -100]] | * [[Kobold Dungeon -100]] | ||
* Kobold Dungeon -300 | * [[Kobold Dungeon -300]] | ||
'''Expected | <big>'''Recommended Protections'''</big> | ||
* Water Breathing, Death, Stun | |||
<big>'''Expected Enemy Pack(s)'''</big> | |||
* (2x) [[Bloodlands_Creature_Info#level16OrcSentry_2|Orc]] - Archer | * (2x) [[Bloodlands_Creature_Info#level16OrcSentry_2|Orc]] - Archer | ||
* (1x) [[Bloodlands_Creature_Info#level16Lich_2|Lich]] - Caster | * (1x) [[Bloodlands_Creature_Info#level16Lich_2|Lich]] - Caster | ||
* (3x) [[Bloodlands_Creature_Info#level16Kobold_2|Kobold]] - Melee | * (3x) [[Bloodlands_Creature_Info#level16Kobold_2|Kobold]] - Melee | ||
* ( | * (2x) [[Bloodlands_Creature_Info#level16Orc_2|Orc]] - Melee | ||
* (1x) [[Bloodlands_Creature_Info#level16Hobgoblin_2| | * (1x) [[Bloodlands_Creature_Info#level16Hobgoblin_2|Hobgoblin]] - Melee | ||
* ( | * (2x) [[Bloodlands_Creature_Info#level16Piranha|piranha]] - Melee | ||
<big>'''Mini Bosses'''</big> | |||
* (1x) [[Bloodlands_Creature_Info#BossKeepNotablelevel16Kobold|Kobold]] - Melee | |||
<big>'''Bosses'''</big> | |||
* http://www.stormhalter.com/mediaWiki/images/bestiary/body-00030.png [[Urgnah The Orc]] | |||
* | |||
''' | <big>'''General Notes'''</big> | ||
* There are invisible Death casting Liches on the West side before the boss room (The 2 fire hexes). Move to the right hand side quickly to avoid being casted on by them. | |||
'' | * During the fight with Urgnah don't panic if some of the Kobold's seem tough. There are a few individual Kobolds stronger then the rest. | ||
* If you are struggling to get down the hole in Urgnah's room; utilize the Down command instead of the Climb Down. | |||
* Jumping down the hole will prevent Urgnah from following you, but his monsters will still follow! | |||
Latest revision as of 05:05, 4 February 2025

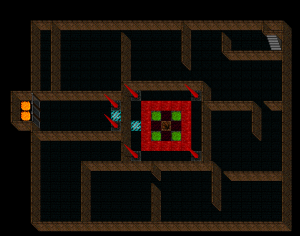
The second floor of the Kobold Dungeon has similar monsters to the first, but contains a boss at the very end of the tunnel named Urgnah.
Urgnah room contains multiple enemy packs. Adventures hoping to find refuge in the pools of blood inside of Urgnah's room will quickly find themselves being chomped on by vicious piranhas!
Connected Areas
Recommended Protections
- Water Breathing, Death, Stun
Expected Enemy Pack(s)
- (2x) Orc - Archer
- (1x) Lich - Caster
- (3x) Kobold - Melee
- (2x) Orc - Melee
- (1x) Hobgoblin - Melee
- (2x) piranha - Melee
Mini Bosses
- (1x) Kobold - Melee
Bosses
General Notes
- There are invisible Death casting Liches on the West side before the boss room (The 2 fire hexes). Move to the right hand side quickly to avoid being casted on by them.
- During the fight with Urgnah don't panic if some of the Kobold's seem tough. There are a few individual Kobolds stronger then the rest.
- If you are struggling to get down the hole in Urgnah's room; utilize the Down command instead of the Climb Down.
- Jumping down the hole will prevent Urgnah from following you, but his monsters will still follow!
