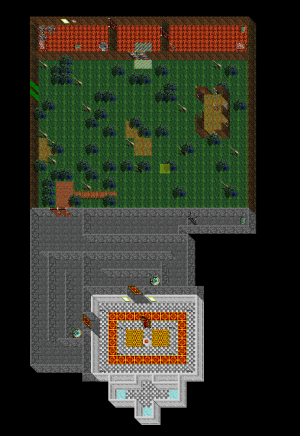
Kobold Dungeon -300: Difference between revisions
From Stormhalter
No edit summary |
No edit summary |
||
| (8 intermediate revisions by the same user not shown) | |||
| Line 1: | Line 1: | ||
[[File:Bloods-300.png|thumb|Kobold Dungeon -300]]<div>The third and final floor of the Kobold Dungeon. | [[File:Bloods-300.png|thumb|Kobold Dungeon -300]]<div>The third and final floor of the Kobold Dungeon. There are two ways to reach this floor. The simplest is to drop down from Urgnah's lair. This will place you in the company of a friendly balm seller who takes residence on this floor (NW corner of map). You can utilize the seller in conjunction with the gated entrance to safely farm & explore this area. Be careful of the roaming Apep though! | ||
Over by Lardil is a rope that leads all the way up to the Bloodlands Surface Tower Top. To utilize this shortcut you will need to have a bright feather handy though. | |||
Past the swamps in the southwest lies a dock that will grant entrance to the King and Queen. Be wary, as this dock is protected by death casting statues. | Past the swamps in the southwest lies a dock that will grant entrance to the King and Queen. Be wary, as this dock is protected by death casting statues. | ||
| Line 9: | Line 11: | ||
* [[Kobold Dungeon -200]] | * [[Kobold Dungeon -200]] | ||
* [[Bloodlands Surface Town|Surface Town]] | * [[Bloodlands Surface Town|Bloodlands Surface Town]] | ||
* [[Surface Tower Top|Surface Tower Top]] | |||
<big>'''Recommended Protections'''</big> | <big>'''Recommended Protections'''</big> | ||
Water Breathing, Death, Stun, Poison | * Water Breathing, Death, Stun, Poison | ||
<big>'''Expected Enemy Pack(s)'''</big> | <big>'''Expected Enemy Pack(s)'''</big> | ||
* (2x) [[Bloodlands_Creature_Info#level17TrollSentry|Servent of Apep]] - Archer | * (2x) [[Bloodlands_Creature_Info#level17TrollSentry|Servent of Apep]] - Archer | ||
* (1x) [[Bloodlands_Creature_Info#evilStatue300|evil statue]] - Caster | * (1x) [[Bloodlands_Creature_Info#evilStatue300|evil statue]] - Caster/Melee | ||
* (1x) [[Bloodlands_Creature_Info#level17Spectre|Spectre]] - Caster | * (1x) [[Bloodlands_Creature_Info#level17Spectre|Spectre]] - Caster/Melee | ||
* (2x) [[Bloodlands_Creature_Info#level17Dweller300|dweller]] - Melee | * (2x) [[Bloodlands_Creature_Info#level17Dweller300|dweller]] - Melee | ||
* (1x) [[Bloodlands_Creature_Info#level17EliteTroll|Servent of Apep]] - Melee | * (1x) [[Bloodlands_Creature_Info#level17EliteTroll|Servent of Apep]] - Melee | ||
* (1x) [[Bloodlands_Creature_Info#level17Lurker|slime lurker]] - Melee | * (1x) [[Bloodlands_Creature_Info#level17Lurker|slime lurker]] - Melee | ||
* (2x) [[Bloodlands_Creature_Info#level17Piranha| | * (2x) [[Bloodlands_Creature_Info#level17Piranha|piranha]] - Melee | ||
* (1x) [[Bloodlands_Creature_Info#level17Shark|Shark]] - Melee | * (1x) [[Bloodlands_Creature_Info#level17Shark|Shark]] - Melee | ||
* (3x) [[Bloodlands_Creature_Info#level17Wyvern|slime wyvern]] - Melee | * (3x) [[Bloodlands_Creature_Info#level17Wyvern|slime wyvern]] - Melee | ||
| Line 33: | Line 35: | ||
<big>'''Bosses'''</big> | <big>'''Bosses'''</big> | ||
http://www.stormhalter.com/mediaWiki/images/bestiary/body-00006.png | * http://www.stormhalter.com/mediaWiki/images/bestiary/body-00006.png [[Apep]] | ||
* http://www.stormhalter.com/mediaWiki/images/bestiary/body-00088.png [[The King]] | |||
* http://www.stormhalter.com/mediaWiki/images/bestiary/body-00087.png [[The Queen]] | |||
* http://www.stormhalter.com/mediaWiki/images/bestiary/body-00205.png [[Lardil the disgraced|Lardil the Disgraced]] | |||
* [[Lardil the disgraced|Lardil the Disgraced]] | |||
Latest revision as of 05:07, 4 February 2025

The third and final floor of the Kobold Dungeon. There are two ways to reach this floor. The simplest is to drop down from Urgnah's lair. This will place you in the company of a friendly balm seller who takes residence on this floor (NW corner of map). You can utilize the seller in conjunction with the gated entrance to safely farm & explore this area. Be careful of the roaming Apep though!
Over by Lardil is a rope that leads all the way up to the Bloodlands Surface Tower Top. To utilize this shortcut you will need to have a bright feather handy though.
Past the swamps in the southwest lies a dock that will grant entrance to the King and Queen. Be wary, as this dock is protected by death casting statues.
If you can fight your way past all of this... there are portals hidden in a room behind the throne room to take you back home!
Connected Areas
Recommended Protections
- Water Breathing, Death, Stun, Poison
Expected Enemy Pack(s)
- (2x) Servent of Apep - Archer
- (1x) evil statue - Caster/Melee
- (1x) Spectre - Caster/Melee
- (2x) dweller - Melee
- (1x) Servent of Apep - Melee
- (1x) slime lurker - Melee
- (2x) piranha - Melee
- (1x) Shark - Melee
- (3x) slime wyvern - Melee
Bosses
General Notes
- There is a balm seller in the northwest corner (right after the -200 drop down).
- Apep respawns very quickly and wanders the entire area, its easy to be overwhelmed and unable to escape in the water. If you cant defeat him, make sure to have an escape plan.
- The trolls worshipping Apep gather on the islands in the swamp, be ready for a fight if you want to get on dry land.
- There are dangerous death spell casting statues on the southern docks of the swamp. They can catch you by surprise if you are not ready for them.
- The King & Queen can be separately pulled if you are patient from the west doorway to their lair.


