WorldForge
TODO: Wiki-fy this document: WorldForge Quickstart
Legends of Kesmai is survived by re-creation projects, such as Lands of Kesmai and Stormhalter. While the former has implemented the original-game segments (Axe Glacier, Kesmai, Leng, Oakvael, Praetoseba, Underkingdom) and advanced-game segments (Annwn, Shukumei, Rift Glacier, Torii), it has not introduced any unexplored segments. Stormhalter was created with the goal to adventure beyond just the known lands; for that reason, the project team developed WorldForge for players to create new segments.
Kesmai.WorldForge.exe is located in the same directory as the game client, Kesmai.Client.exe. All segments are managed through a project file with the extension "mapproj." This file format in in XML and is human-readable to better understand changes made by multiple users. All segments currently open-sourced are available on Github. These segments may change from open-source to closed-source to prevent new content from spoiling. No point to an adventure if you know the challenges ahead.
WorldForge allows for the editing of map terrain, interesting locations, subregions, creature spawns, and randomized treasures. We'll go over each aspect below along with the UI elements.
Main UI overview
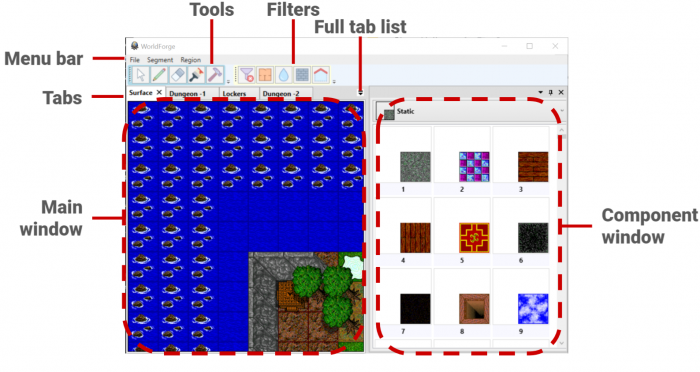
| Arrow | Select tiles within a region tab. |
| Draw (Pencil) | Place a component. |
| Erase | Delete a component. |
| Draw (Brush) | Only on walls, place a component. |
| Indestructible | Set a component (TODO: Or wall only?) as indestructible. |
From the main menu at the top of the window, select "File" > "Create Segment" or "Open Segment." After the segment has been created, or loaded, you'll see many document tabs open. Those beginning with a "(" and closing with ")" are declarative editors for locations, subregions, spawns, and treasures. Other tabs may be terrain editors for a region.
Creating and Loading Segments
From the main menu at the top of the window, select "File" > "Create Segment" or "Open Segment." After the segment has been created, or loaded, you'll see many document tabs open. Those beginning with a "(" and closing with ")" are declarative editors for locations, subregions, spawns, and treasures. Other tabs may be terrain editors for a region.
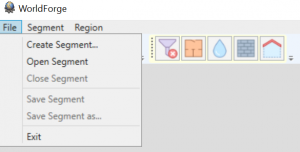
About Tabs
There are two types of tabs differentiated by parenthesis:
- Region tabs. Not in parenthesis.
- Utility tabs (TODO: this is a bad name. Fix). Enclosed in parenthesis.
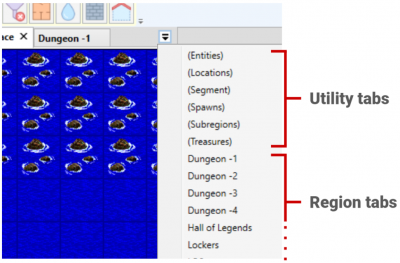
Region Tabs
Creation
Segments for Stormhalter are not on a single plane, unlike the original game. Rather, they are comprised of multiple maps to isolate areas between different zones and/or elevations. We'll refer to the isolated areas as "Regions." To create a new region, select from the main menu "Segment" > "Create Region." This will add a new tab to your documents. But, this is just a generically named region, you want to make it "The Zone of Death", right?
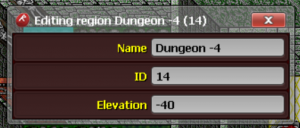
Using the arrow tool, double click any black portion of the region, and you'll access a property window. A few things to note:
- Regions may have similar names, they need not be unique.
- Regions must have a unique id.
- Elevation applies to the whole region.
Controls
The terrain editor controls are intended to be similar to an image editor.
| Select / modify tile | Left click. |
| Edit region properties | Double left click an empty tile. |
| Pan | The W S A D keys, or right-click drag your mouse. |
| Delete tile | Left-click and "delete" key. |
| Append components to an existing tile | Hold shift and left-click. |
| Tile properties and components | Double left click. |
Each region tile is comprised of "components" that handle a functionality of that tile. For example, a floor component may deal with all things related to pathing and movement. All components have adjustable properties that can be accessed by double-clicking that tile.
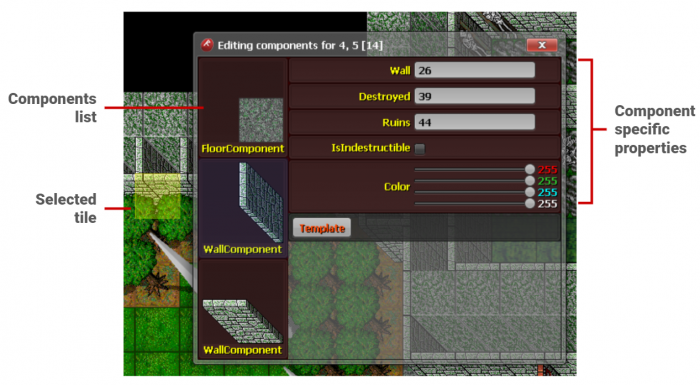
To place a component:
- Select the "Draw" tool from the toolbar below the main menu, it is designated by a pencil icon.
- Select the component you wish to draw from the components panel on the right-side of the UI. Components are organized by their functionality, be sure to utilize the drop down menu at the top.
- Place the component on the tile by either: Left-click to replace an existing component or holding shift + left-click to append the component.
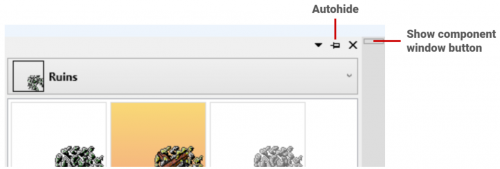
Segment Tab
Internal sub-tab
- Static content usable across all tabs.
Regions sub-tab
- Contains overview of regions and allows changing of region-wide properties.
Entities Tab
Contains definitions and templates of NPCs and crits to be used in WorldForge.
Allows OnSpawn and OnDeath scripts. Script editor has autocomplete functionality to make things easier.

(TODO: Where are these classes (WoodenStaff, Wight, etc) defined? Is there a reference list/document?)
Locations Tab
Contains definitions of locations to be used in WorldForge.
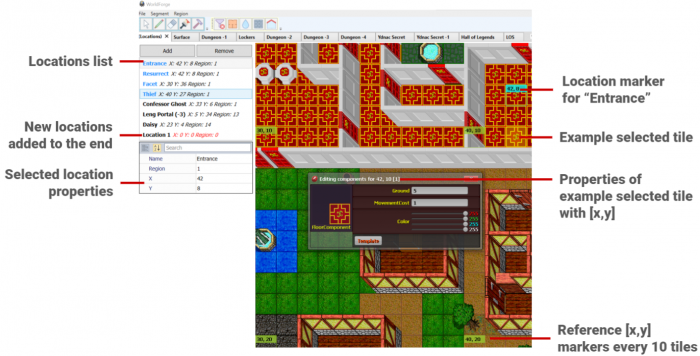
Adding a location
To add a new location:
- Click the Add button in the locations list.
- At the bottom of the list, select the new location.
- Name the location.
- Set the Region ID, X, and Y values.
The location in the map will update as values are set. A list of region IDs can be found under (Segment) tab > Regions sub-tab.
Subregions tab
Subregions can be created to define zones used by the client and server. Subregions are not used elsewhere in Worldforge.
Add a subregion
To add a subregion:
- Click the Add button in the subregions list.
- At the bottom of the list, select the new subregion.
- Name the subregion and and set the containing region’s ID.
- Set other properties.
- Add bounding boxes to cover the region.
- Add the top left tile coordinates [x, y] to the columns [Left, Top].
- Add the bottom right tile coordinates [x, y] to the columns [Right, Bottom].
- Add additional bounding boxes to lower rows if needed.
Spawns tab
The spawns tab defines spawns in the segment.
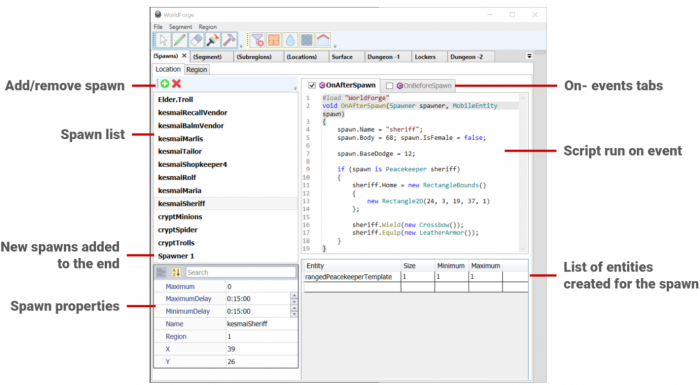
(TODO: What is maximum and size?)
Add a custom spawn in the Location sub-tab
(TODO: What’s a better description than “custom spawn”?)
To add a spawn:
- Click the add spawn button.
- Scroll to the bottom and select the new spawn.
- Set spawn properties, which include the spawn location [region, x, y].
- Add entities to spawn, defined in the (Entities) tab, and each of their spawn properties.
- If needed, add before and after spawn scripts to customize the entities and spawn.
Add a general spawn area in the Region sub-tab
To add a spawn:
- Follow the same steps from adding a custom spawn, excluding the on- event scripts.
- Specify the area of the spawn.
- Create inclusion bounding boxes for the area to spawn the entities.
- Add the top left tile coordinates [x, y] to the columns [Left, Top].
- Add the bottom right tile coordinates [x, y] to the columns [Right, Bottom].
- Add additional bounding boxes to lower rows if needed.
- If needed, create exclusion bounding boxes to remove tiles from included areas.
- Add the top left tile coordinates [x, y] to the columns [Left, Top].
- Add the bottom right tile coordinates [x, y] to the columns [Right, Bottom].
- Add additional bounding boxes to lower rows if needed.
- Create inclusion bounding boxes for the area to spawn the entities.
Treasures Tab
The treasures tab contains definitions for loot drops. Drops are added to entities in the (Entities) tab within an OnSpawn event script. A single treasure drop will drop one item from the item list depending on the item’s drop probability.
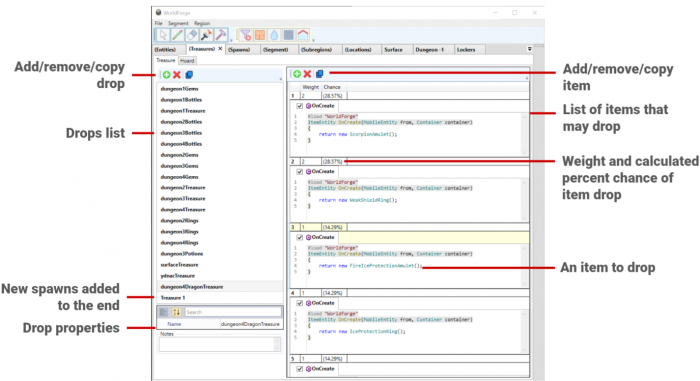
Adding a drop in the Treasures sub-tab
To add a treasure drop:
- Click the add treasure drop button.
- Scroll to the bottom and select the new treasure drop.
- Set the drop’s properties.
- Add the posibile items for the drop.
- Click the add item button.
- In the new item’s OnCreate script, substitute the item in the return statement.
- Add as many items as needed.
- Set the weight value for each item as needed.
Adding a drop in the Hoard sub-tab
(TODO: Can’t tell what this is. Do.)